It’s not exactly news that during the current Coronavirus pandemic, most of us are working from home for the foreseeable. While this is great news for our skin (can you remember the last time you wore makeup? Nope, us neither), it’s likely messing with our posture, big time.
We’re likely sitting in one position for hours, stiff and hunched over our laptops, which will leave us with very unhappy joints and muscles.
Luckily, fitness guru Kayla Itsines has shared her at-home fitness ‘Postural Workout’ with GLAMOUR for when you need to take a break and energise yourself – and it takes just a few minutes.
“During the working day, this quick postural workout can help to open up tight chest muscles and strengthen your upper back muscles,” says Kayla. “There are four exercises in total: two mobility stretches and two strength exercises. This should take you no longer than 5 minutes to complete and can be done multiple times per day if necessary.”
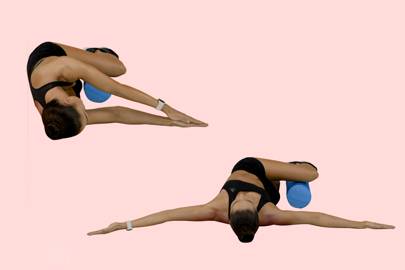
Supine Thoracic Rotation
16 reps (8 per side)
Step 1: Lay on your right side with your arm extended along the mat and your head relaxed on your arm. While keeping your right leg straight, bend your left knee and hip to a 90-degree angle in front of you. With your hands together, extend your arms directly in front of your chest. Ensure that your hips are stacked and that you maintain a small gap between your waist and the floor. This is your starting position.
Step 2: Inhale. Exhale while keeping your lower body as still as possible, release your left hand and rotate your torso away from your right arm by drawing your left shoulder towards the floor. At the same time, allow your left arm to rotate with your torso until the top of your hand is resting on the floor.
Step 3: Inhale as you rotate your arm and torso back toward your right arm to return to the starting position.
Complete half of the specified time on the same side, before repeating the remaining time on the other side.
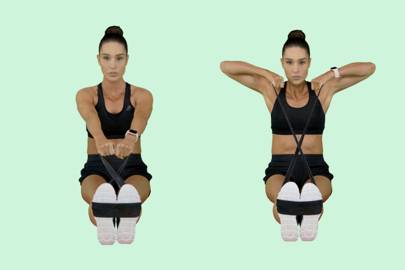
Face Pull
12 reps
Step 1: While seated on a yoga mat, extend both legs out in front of you with your feet flexed. Wrap the recovery band around the bottom of your feet so that you are holding one end of the band in each hand. Ensure that the recovery band is in good condition and securely anchored around your feet to avoid injury. You could also press your feet against a sturdy object to help keep the band in place. Sit up tall and draw your shoulder blades down and back to push your chest out. Extend your arms in front of you so that you are holding the ends of the band with an overhand grip (palms facing down). It is important that there is some tension in the band when in this position – if there isn’t, you will need to place your hands further down the band. This is your starting position.
Step 2: Inhale and brace your core. Exhale as you bend your elbows outwards and, using the muscles in your shoulders and back, bring the ends of the band in towards your face until your hands are by your ears. Avoid “shrugging” your shoulders by squeezing your shoulder blades down and back.
Step 3: Inhale as you extend your elbows to return to the starting position. Repeat for the specified number of repetitions.
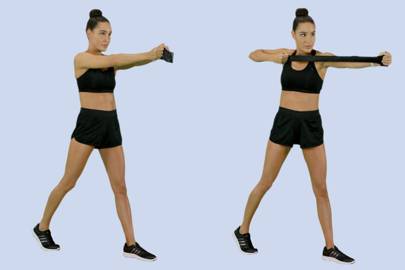
Archers
16 reps (8 per side)
Step 1: Plant your feet in a split stance with your left foot forward and right foot back. Extend your arms directly in front of your chest, holding the ends of the recovery band with a neutral grip (palms inwards). This is your starting position.
Step 2: Inhale and brace your core. Exhale as you bend your right elbow and rotate your torso to bring the end of the band in towards your right shoulder, keeping your left arm fully extended in the starting position. You should feel a small squeeze between your shoulder blades.
Step 3: Inhale as you rotate your torso and extend your right arm to return to the starting position. Complete for the specified number of repetitions on each side.
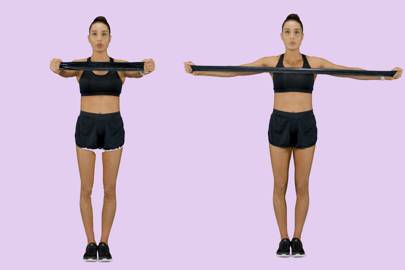
Band Pull-Aparts
12 reps
Step 1: Plant both feet on the floor slightly further than shoulder-width apart. Hold one hand on each end of the recovery band with an overhand grip (palms facing down) and extend your arms directly in front of your chest, ensuring that your elbows are completely locked. This is your starting position.
Step 2: Inhale and brace your core. Exhale. Using the muscles in your shoulders and back, pull the recovery band ends outwards and backwards until your arms are in line with your shoulders. You should feel a small squeeze between your shoulder blades.
Step 3: Inhale. Hold this position briefly before gently drawing the ends of the recovery band together to return to the starting position. Repeat for the specified number of repetitions.